By Nancy Chatham, RN, MSN, ANP-BC, CCNS, CWOCN, CWS, and Lori Thomas, MS, OTR/L, CLT-LANA
An estimated 7 million people in the United States have venous disease, which can cause leg edema and ulcers. Approximately 2 to 3 million Americans suffer from secondary lymphedema. Marked by abnormal accumulation of protein-rich fluid in the interstitium, secondary lymphedema eventually can cause fibrosis and other tissue and skin changes. (more…)
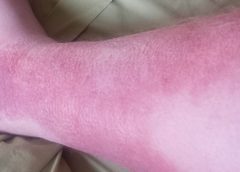
The ability to understand or “read” lower-extremity redness in your patient is essential to determining its cause and providing effective treatment. Redness can occur in multiple conditions—hemosiderin staining, lipodermatosclerosis, venous dermatitis, chronic inflammation, cellulitis, and dependent rubor. This article provides clues to help you differentiate these conditions and identify the specific cause of your patient’s lower-extremity redness. (more…)
The Affordable Care Act of 2010 requires nursing homes to have an acceptable Quality Assurance and Performance Improvement (QAPI) plan within a year after the start of the QAPI regulation. While the implementation of this regulation may be a year out, now is the time to start applying its principles. Reducing pressure ulcer rates is a great program to target for a QAPI plan.
A team approach
If you decide to use pressure ulcers as your QAPI project, don’t take on your entire program at once. Break the program down into system subsets (for example, admission process, prevention program, and weekly rounds). Determining the status of your program in each subset—completed, needs improvement, or not completed—can help you prioritize which areas to target. It’s important you have support from leadership for your efforts.
I’ll use the example of the admission phase (ensuring that within the first 24 hours, skin and risk concerns are identified and a temporary plan of care is implemented) to illustrate a QAPI project. To address this area, a team was created, including representation from staff members involved with the admission process. The team then used the problem-solving model Plan-Do-Study-Act (PDSA) to examine the process.
The first step in the PDSA cycle is to Plan. During this step, you:
• evaluate and analyze the current process to determine baseline data, which are used to measure progress
• identify system performance gaps
• determine the root cause of the performance gaps
• develop an action plan that identifies the goals, steps, responsible staff, and target dates.
In our example, the team determined that within the first 24 hours, skin inspections were being completed only 10% of the time. The root-cause analysis revealed that the admission nurses didn’t feel competent to document identified pressure ulcers or skin concerns, so they deferred it until the wound nurse was available. The team’s action plan included the following:
• Develop and educate all the facility nurses on how to complete and accurately document a skin inspection.
• Develop and implement a competency evaluation to assess the nurse’s ability to apply the knowledge at the bedside.
• Develop an ongoing plan to ensure all nurses receive this education during orientation and yearly thereafter.
The team also set the following goal:
By the end of the next quarter, 100% of admitted patients will have an accurate skin inspection completed within 24 hours of admission.
The second step of the PDSA cycle is Do. During this step, you implement and execute the plan, while documenting your observations and recording data.
In our example, the “Do” was to:
• develop and provide the skin inspection education and bedside competency evaluations
• develop an evaluation and tracking
system
• add the education to the orientation program
• add the education to the staff development calendar to be offered yearly.
The third step of the PDSA cycle is to Study: In this phase, you:
• reevaluate and analyze the system
• compare the results with the baseline data and predictions
• summarize what was learned and accomplished and what needs to be improved
• determine if another PDSA cycle is
necessary to continue to improve the system.
Once all staff had been properly educated and competency testing completed, an analysis of the rate and accuracy of the admission skin inspections done within 24 hours of admission was completed. It was found that 100% of the patients admitted had a complete skin inspection done within 24 hours. However, not all the nurses could accurately stage pressure ulcers, so it was determined that the system needed improvement to ensure accurate assessments.
The last step of the PDSA cycle is to Act. In this step, you:
• determine what changes need to be made
• modify the plan to continue to improve the system
• repeat the PDSA cycle as necessary.
In our example, the team determined the nurses needed more guidance and education on staging of pressure ulcers. Therefore, a new PDSA cycle was set to ensure the nurses are competent in this area.
Benefits for staff and patients
It may be difficult to start the QAPI project and at times the process may be stressful, but keep in mind that a successful pressure ulcer QAPI project can improve not only the quality of life and care of your patients but also morale and team building for your staff. n
Jeri Lundgren is director of clinical services at Pathway Health in Minnesota. She has beenspecializing in wound prevention and management since 1990.
The elevator door opens and you step in to find yourself face to face with the important person you’ve wanted to meet to discuss your promising idea. It’s the chance you wouldn’t want to miss. But that chance lasts only as long as the elevator ride. You have less than a minute to make an impression. Do you have an elevator speech ready?
What’s an elevator speech?
An elevator speech is any short speech that sells an idea, promotes a business, or markets an individual. It’s a short summary, or pitch, that quickly describes the value of a service, product, or organization. The term is a metaphor for unexpected access to someone to whom you’d like to sell an idea or proposal. It derives from the early days of the Internet boom when web development companies needed venture capital. Firms were swamped with applications for funding, and in many cases, the companies that won the cash were those whose reps had a simple pitch and could explain a business proposal in an elevator in the time it took to ride to their floor.
A great elevator speech describes and sells an idea in less than a minute. Of course, it’s not restricted to elevators. It comes in handy any time and anywhere you need to give a concise presentation to capture someone’s interest so you can move to the next step—a follow-up call, a referral, a meeting, or a partnership.
Why clinicians need an elevator speech
You need to be able to describe what you do, what you’re interested in doing, and how you can be a resource to someone. The ability to sum up a unique aspect of your service or expertise in a way that excites others is a fundamental skill. Doing this in a brief, persuasive manner is an asset for any professional. A good elevator speech should grab one’s attention in a few words and make that person want to know more about you. Here are examples where a good elevator speech would be helpful:
• Thomas goes to a recruitment fair hoping to get an interview at a certain hospital.
• Mary is finishing her master of science degree and is interested in a position in a new wound care clinic.
• Caroline has written a book on grant writing and would like to present her ideas at a conference.
• Brian is interested in research and would like to join the research team.
• Mindy is trying to expand her wound consultation business.
You can use an elevator speech when you want to grab someone’s attention at a meeting, convention, or other social situation. In such situations, people typically ask, “What do you do?” A well-planned elevator speech can make the listener’s ears perk up and want to know more.
How to prepare an elevator speech
Before you can write an elevator speech, you need to know yourself, what you can offer, what problems you can solve, and what benefits you can bring to the prospective contact. For example, you may be an expert in professional communication and know strategies you can teach other staff to promote a better workplace environment.
You also need to know your audience. Will you direct your pitch to an administrator, a unit manager, or staff? You’re more likely to succeed if your elevator speech is targeted to a specific audience and you adjust it to that audience. Try to prepare different pitches for different audiences; a generic pitch is almost certain to fail. (See Key elements of a good elevator speech by clicking the PDF icon above.)
In today’s busy world, clinicians must be able to communicate in a succinct, persuasive manner. Your elevator speech is your introduction to others. It has to be good. Keep practicing it and perfecting it so you can speak with poise and polish. The more often you give it, the better it will become. It’s a great way to put your best foot forward when you have only a small window of opportunity to make a good impression.
Sjodin T. Small Message, Big Impact: The Elevator Speech Effect. New York, NY: Portfolio; 2012. Sprung S, Giang V. 6 keys to delivering a powerful elevator pitch. Business Insider Web site. www .businessinsider.com/terri-sjodin-how-to-deliver- an-elevator-speech-2012-10. October 26, 2012. Accessed October 26, 2012.
Kathleen D. Pagana is a keynote speaker and professor emeritus at Lycoming College in Williamsport, Pennsylvania. She is the author of The Nurse’s Communication Advantage and The Nurse’s Etiquette Advantage. She is also the coauthor of Mosby’s Diagnostic and Laboratory Test Reference, 11th ed. To contact her, visit www.KathleenPagana.com.
Chronic venous insufficiency (CVI) is the most common cause of lower extremity wounds. The venous tree is defective, incapable of moving all the blood from the lower extremity back to the heart. This causes pooling of blood and intravascular fluid at the lowest gravitational point of the body—the ankle.
This article has two parts. Part 1 enhances your understanding of the disease and its clinical presentation. Part 2, which will appear in a later issue, explores the differential diagnosis of similar common diseases, the role that coexisting peripheral artery disease (PAD) may play, disease classification of venous insufficiency, and a general approach to therapy.
The most common form of lower extremity vascular disease, CVI affects 6 to 7 million people in the United States. Incidence increases with age and other risk factors. One study of 600 patients with CVI ulcers revealed that 50% had these ulcers for 7 to 9 months, 8% to 34% had them for more than 5 years, and 75% had recurrent ulcers.
Thrombotic complications of CVI include thrombophlebitis, which may range from superficial to extensive. If the thrombophlebitis extends up toward the common femoral vein leaving the leg, proximal ligation may be needed to prevent clot extension or embolization.
Understanding normal anatomy and physiology
Lower extremity veins flow horizontally from the superficial veins to the perforating veins and then into the deep veins. Normally, overall venous blood flows vertically against gravity from the foot and ankle upward toward the inferior vena cava (IVC). This antigravity flow toward the IVC results from muscular contraction around nonobstructed veins and one-way valves that close as blood passes them. These valves prevent abnormal backward blood flow toward the foot and ankle region.
The lower extremities have four types of veins. Superficial veins are located within the subcutaneous tissue between the dermis and muscular fascia. Examples are the greater and lesser (smaller) saphenous veins. Perforating veins connect the superficial veins to the deep veins of the leg. The deep veins are located below the muscular fascia. The communicating veins connect veins within the same system.
The greater saphenous vein is on the leg’s medial (inner) side. It originates from the dorsal veins on top of the foot and eventually drains into the common femoral vein in the groin region. By way of perforating veins, the greater saphenous vein drains into the deep venous system of both the calf and thigh.
The lesser saphenous vein is situated on the lateral (outer) side of the leg and originates from the lateral foot veins. As it ascends, it drains into the deep system at the popliteal vein behind the knee. Communicating veins connect the greater saphenous vein medially and the lesser saphenous vein laterally.
Intramuscular veins are the deep veins within the muscle itself, while the intermuscular veins are located between the muscle groups. The intermuscular veins are more important than other veins in development of chronic venous disease. Below the knee, the intermuscular veins are paired and take on the name of the artery they accompany—for example, paired anterior tibial, paired posterior tibial, and paired peroneal veins. Eventually, these veins form the popliteal vein behind the knee, which ultimately drains into the femoral vein of the groin.
As the common femoral vein travels below the inguinal ligament of the groin, it’s called the external iliac vein. Eventually, it becomes the common iliac vein, which drains directly into the IVC.
Pathophysiology
Abnormally elevated venous pressure stems from the leg’s inability to adequately drain blood from the leg toward the heart. Blood drainage from the leg requires the muscular pumping action of the leg onto the veins, which pump blood from the leg toward the heart as well as from the superficial veins toward the deep veins. Functioning one-way valves within the veins close when blood passes them, preventing blood from flowing backward toward the ankle. This process resembles what happens when you climb a ladder with intact rungs: As you step up from one rung to the next, you’re able to ascend.
CVI and the “broken rung” analogy
If the one-way valves are damaged or incompetent, the “broken rung” situation occurs. Think how hard it would be to climb a ladder with broken rungs: You might be able to ascend the ladder, but probably you would fall downward off the ladder due to the defective, broken rungs.
Normally, one-way valves ensure that blood flows from the lower leg toward the IVC and that the superficial venous system flows toward the deep venous system. The venous system must be patent (open) so blood flowing from the leg can flow upward toward the IVC. Blockage of a vein may result from an acute thrombosis (clot) in the superficial or deep systems. With time, blood may be rerouted around an obstructed vein. If the acute thrombosis involves one or more of the one-way valves, as the obstructing thrombosis opens up within the vein’s lumen, permanent valvular damage may occur, leading to post-thrombotic syndrome—a form of CVI.
CVI may result from an abnormality of any or all of the processes needed to drain blood from the leg—poor pumping action of the leg muscles, damage to the one-way valves, and blockage in the venous system. CVI commonly causes venous hypertension due to reversal of blood flow in the leg. Such abnormal flow may cause one or more of the following local effects:
leg swelling
tissue anoxia, inflammation, or necrosis
subcutaneous fibrosis
Compromised flow of venous blood or lymphatic fluid from the extremity.
“Water balloon” analogy
The effect of elevated venous pressure or hypertension is worst at the lowest gravitational point (around the ankle). Pooling of blood and intravascular fluid around the ankle causes a “water balloon” effect. A balloon inflated with water has a thin, easily traumatized wall. When it bursts, a large volume of fluid drains out. Due to its thicker wall, a collapsed balloon that contains less fluid is more difficult to break than one distended with water.
In a leg with CVI, subcutaneous fluid that builds up requires a weaker force to break the skin and ulcerate than does a nondistended leg with less fluid. This principle is the basis for compression therapy in treating and preventing CVI ulcers.
Effects of elevated venous pressure or hypertension
Increased pressure in the venous system causes:
abnormally high pressure in the superficial veins—60 to 90 mm Hg, compared to the normal pressure of 20 to 30 mm Hg
dilation and distortion of leg veins, because blood refluxes abnormally away from the heart and toward the lower leg and may move from the deep venous system into the superficial veins.
Abnormal vein swelling from elevated pressure in itself may impair an already abnormally functioning one-way valve. For instance, the valve may become more displaced due to the increase in intraluminal fluid, which may in turn worsen hypertension and cause an increase in leg swelling. Increased pressure from swollen veins also may dilate the capillary beds that drain into the veins; this may cause leakage of fluid and red blood cells from capillaries into the interstitial space, exacerbating leg swelling. Also, increased venous pressure may cause fibrinogen to leak from the intravascular plasma into the interstitial space. This leakage may create a fibrin cuff around the capillary bed, which may decrease the amount of oxygen entering the epidermis, increase tissue hypoxia, trigger leukocyte activation, increase capillary permeability, and cause local inflammation. These changes may lead to ulceration, lipodermatosclerosis, or both.
Visible changes may include dilated superficial veins, hemosiderin staining due to blood leakage from the venous tree, atrophie blanche, and lipodermatosclerosis. (See CVI glossary by clicking the PDF icon above.) Both atrophie blanche and lipodermatosclerosis result from local tissue scarring secondary to an inflammatory reaction of the leg distended with fluid.
Lipodermatosclerosis refers to scarring of subcutaneous tissue in severe venous insufficiency. Induration is associated with inflammation, which can cause the skin to bind to the subcutaneous tissue, causing narrowing of leg circumference. Lymphatic flow from the leg also may become compromised and inhibited in severe venous hypertension, causing additional leg swelling.
Patient history
In a patient with known or suspected CVI, a thorough history may lead to a working diagnosis. Be sure to ask the patient these questions:
Do you have pain?
Is your pain worse toward the end of the day?
Is the pain relieved with leg elevation at night?
Is it relieved with leg elevation during the day?
Do you have leg pain that awakens you at night?
How would you describe the pain?
Does the skin on your leg feel tight or irritated?
Have you noticed visible changes of your leg?
Do you have a leg ulcer?
Also determine if the patient has comorbidities that may exacerbate CVI, including PAD, renal failure, venous thrombosis, lymphedema, diabetes mellitus, heart failure, or malnutrition. (See CVI risk factors by clicking the PDF icon above .)
Common CVI symptoms
Approximately 20% of CVI patients have symptoms of the disease without physical findings. These symptoms may include:
tired, “heavy” legs that feel worse toward the end of the day
discomfort that worsens on standing
legs that feel best in the morning after sleeping or after the legs have been
elevated during the day.
Although patients may report leg discomfort, the history indicates that it doesn’t awaken them at night. Be aware that discomfort from CVI differs from that caused by PAD. With PAD, patients may report pain on exercise (claudication), pain with elevation (nocturnal pain), or constant pain (resting pain).
Signs of CVI (with or without ulcers) include:
leg swelling (seen in 25% to 75% of patients)
skin changes (such as hemosiderin staining or dermatitis)
telangiectasia, reticular veins, or both; while these are the most common signs, they represent an overall less severe finding
varicose veins with or without bleeding, occurring in one-third of patients with CVI.
Venous ulcers
Venous ulcers are the most common type of lower extremity ulcer. They’re commonly found on the medial aspect of the lower extremity, from the ankle to the more proximal calf area. Usually, they arise along the course of the greater saphenous vein, but also may be lateral and may occur at multiple locations. They aren’t found above the knee or on the forefoot. Venous ulcers are shallower than arterial ulcers and have considerable exudate consistent with drainage from a ruptured water balloon. They may extend completely around the leg.
CVI: From a heavy sensation to visible changes
In patients with CVI, blood flows within a lower extremity in an abnormal, reverse direction, causing build-up of blood and intravascular fluid around the ankle. Initially, this may cause only a sensation of heavy legs toward the end of the day, with no visible changes. Eventually, it may lead to venous ulcers or other visible changes. This abnormal blood flow results from dysfunction of the normal mechanisms that drain blood from the leg against gravity into the IVC.
Sardina D. Skin and Wound Management Course; Seminar Workbook. Wound Care Education Institute; 2011:92-112.
Donald A. Wollheim is a practicing wound care physician in southeastern Wisconsin. He also is an instructor for Wound Care Education Institute and Madison College. He serves on the Editorial Board for Wound Care Advisor.
If you’re keeping up on wound care, you know a lot of new things are coming to market with enough decent science behind them to make them reasonable options to consider in your practice. And as true-blooded Americans and citizens of the post-industrialized world, we want what’s newest, fastest, and best in class in everything. It’s just our nature.
But does it truly serve us to be eager to try new therapies even when the current treatment plan is successful? Perhaps. We know we must never close our eyes to new developments in our field that can lead to better outcomes. Knowing when and what to change can lead to better outcomes for the patient, the wound, and our collective pocketbook.
I’ve long maintained we can achieve excellent-quality wound care if we just stick to the basics the vast majority of the time. Why? Systemic, psychosocial, and local factors all affect wound healing—not just the dressing or cream. Our job is to provide the optimum environment possible for wound healing. That requires us to look at and support the whole body toward optimum health, not solely the wound.
The basics begin with identifying the cause of the wound and implementing interventions to reduce, control, or eliminate the cause. Next, we strive to manage local and psychosocial factors by choosing topical products that will maintain moisture balance, keep the wound warm, and protect it. If the wound doesn’t show progress toward healing within 2 weeks (or as expected, given the patient’s overall condition and ability to heal), we need to reevaluate the plan and begin making changes.
The best rule is to make one change at a time. That makes it much easier to determine what’s working and what isn’t. Once all the basics are in place and required changes have been made, if healing is still stalled or nonexistent, consider trying the available new products and specialty products.
Never close your clinical mind to advances in the field. To do that would be a disservice to your patients. But you should change the treatment plan only when a change is needed—not just for the sake of changing it.
Donna Sardina, RN, MHA, WCC, CWCMS, DWC, OMS
Editor-in-Chief Wound Care Advisor
Cofounder, Wound Care Education Institute
Plainfield, Illinois
Digital cameras have many helpful features, but the most important considerations for choosing a camera are hardware features. Focus on the following when choosing a camera:
Resolution. The resolution determines picture quality. The National Pressure Ulcer Advisory Panel recommends using a digital camera with a minimum of 3 megapixels
for wound photography. A megapixel is 1 million pixels. The more pixels used to produce a photo, the less grainy it will appear and the clearer any enlargements made from it will be. In essence, the more megapixels a camera produces, the clearer and more detailed the photograph will be. (more…)
A hot flush of embarrassment creates a bead of sweat on my forehead. “I’ve got to get this measurement,” I plead to myself. One glance at the clock tells me this bedside ankle-brachial index (ABI) procedure has already taken more than 30 minutes. My stomach sinks as I realize I’ll have to abandon the test as inconclusive. (more…)
A court case answers the question as to whether a pressure ulcer was preventable
By Nancy J. Brent, MS, RN, JD
Pressure ulcers are a major health risk for every adult patient. Risk factors include sepsis, hypotension, and age 70 or older. These risk factors became all too real when Mr. M developed pressure ulcers after being admitted to a Texas hospital.
Background
Mr. M, age 81, presented at a medical center’s emergency department on January 2 complaining of abdominal pain. After undergoing an assessment, he was diagnosed with gallstones and admitted to the hospital. The next day, he had gallbladder surgery. He subsequently developed a bowel obstruction and had to undergo two more surgeries for this condition over the next 10 days.
On January 13, he was transferred to the intensive care unit (ICU) because of multiple serious medical conditions, including respiratory distress syndrome (necessitating ventilatory support), septic shock, a “blood infection” that caused his blood pressure to drop, and multiorgan failure. His primary physician discontinued tube feedings out of concern they might exacerbate his renal failure; he wrote a do-not-resuscitate order and ordered sedation.
Mr. M was unable to turn or position himself in any way. While in the ICU, he developed a “skin tear” on the tailbone (coccyx) that progressed to a serious pressure ulcer. On February 6, his condition improved enough to allow his transfer to a rehabilitation hospital, where he developed pressure ulcers on his heels. He was transferred to another hospital; the ulcer on his coccyx healed by August. He remained in that hospital for 1 year before being discharged home.
Despite healing of the pressure ulcer on his coccyx, the wound area remained hard and painful, and Mr. M experienced “daily discomfort” there. Also, he was unable to do many of the things he’d been able to do before his hospitalization.
Mr. M files a medical malpractice suit
Mr. M sued the medical center, alleging the hospital was negligent by failing to prevent the pressure ulcer from forming through the use of known “pressure relief” methods, and that the hospital failed to provide proper care and treatment of the wound once it was discovered.
At trial, the medical center lawyers argued that Mr. M’s grave condition caused the pressure ulcer to develop. The jury returned a verdict for Mr. M, finding that the medical center’s negligence proximately caused the injuries he sustained. It awarded him $35,000 for medical expenses; $135,000 for past physical pain and mental anguish; $25,000 for future physical pain and mental anguish; $25,000 for past physical impairment; and $25,000 for future physical impairment. The medical center appealed the decision.
Medical center appeals the verdict
Several issues were raised by the medical center on appeal. Of particular interest to nurses and wound care practitioners was the “cause in fact” or the “proximate cause” of Mr. M’s pressure ulcer on the coccyx. Because an expert witness must establish proximate cause based on a reasonable degree of medical certainty, Mr. M’s case became a battle of the experts regarding the care he received, or lack of care, relative to development of the pressure ulcer.
Expert witness testimony for Mr. M
The first nurse expert to testify was Mr. M’s highly qualified expert. She testified about the various acceptable ways to provide pressure relief, including turning the patient or, if the patient can’t be turned, repositioning. The latter requires use of foam wedges or pillows to elevate a particular body part. The nurse expert testified that if a patient can’t be turned or repositioned, that fact must be documented along with the reason for inability to carry out this nursing care.
Proper assessment of the pressure ulcer is required so that other team members can “see” the wound; the clinician who assesses the wound should draw a picture of exactly what he or she saw when documenting the note in the patient’s chart. The nurse expert testified that the assessment should include the color, duration, and depth of the pressure ulcer; presence or absence of infection; and whether the tissue was dead or perfused.
After reviewing the medical center’s policies and protocols on pressure relief, which required nurses to provide pressure relief every 2 hours, and the depositions of the nurses who’d cared for Mr. M, the nurse expert testified there was no documentation showing Mr. M received any pressure relief from January 13 to January 16. She said she could only conclude that the nurses failed to turn or reposition him during those days. The only notation made about his skin condition was when nurses discovered the “skin tear” on January 14. After this discovery, the physician wasn’t notified of it until January 19. On that date, the physician ordered a wound care consult, but the actual consultation didn’t occur until 3 days later. Even with the wound consultant’s specific, written orders to care for the wound, only one notation existed showing that the orders were followed. Also, the wound care orders weren’t entered into Mr. M’s care plan until January 28. Additionally, in their depositions, the nurses caring for Mr. M couldn’t recall changing the dressing as ordered.
Therefore, in the nurse expert’s opinion, the pressure ulcer on Mr. M’s coccyx was caused directly by failure of the ICU nurses to provide pressure relief from January 14 to January 16 and that providing the wound care that was ordered would have prevented the ulcer from getting worse and would have healed the ulcer.
Although a physician serving as a second expert for Mr. M also testified that pressure relief should have been provided, he couldn’t say that development of the pressure ulcer was unpreventable.
Expert witness testimony for the medical center
Not surprisingly, the medical center’s expert witnesses, two of whom were physicians, testified that because of Mr. M’s general medical condition, he would have developed the pressure ulcer even if hospital policies and protocols had been followed. The hospital’s nurse expert witness stated that Mr. M’s pressure ulcer was not preventable because of his medical condition, regardless of whether or not he was turned. In her opinion, the active range of motion his nurses put him through was enough to reperfuse the area.
Appellate court’s decision
The appellate court upheld the trial court jury’s verdict, stating that evidence presented at the trial was legally and factually sufficient to support that verdict.
Take-away points
Mr. M’s case undoubtedly was complicated by his age and general medical condition, as well as disagreement among expert witnesses as to the cause of the pressure ulcer on his coccyx. Even so, the appellate court held that the evidence at trial (specifically that presented by Mr. M’s nurse expert witness) was sufficient legally and factually to support the verdict in favor of Mr. M. This case illustrates many areas of importance for nurses in terms of formation and care of pressure ulcers. They include the following: • Risk factors supporting potential formation of pressure ulcers can’t be overlooked or underestimated by nursing staff. • A plan to prevent pressure ulcers should be initiated on admission for every patient who is immobile or has other risk factors for pressure ulcers. • Documentation of every aspect of nursing care that’s initiated and continued to prevent pressure ulcers from forming must be carried out as ordered and pursuant to hospital policy and protocol. • Care plans, communications with other health team members, and carrying out of orders must be done as soon as possible. • Assessment and documentation of pressure ulcers should include enough detail so other health team members can visualize what the nurse entering the documentation has seen. • The nurse should assess and stage the pressure ulcer at each dressing change. • One’s expert witness must be credentialed, educated, and experienced in would care prevention and treatment, because his or her testimony can win or lose a case.
Nursing remains at the forefront of protecting and safeguarding patients from pressure ulcers. Although not every ulcer can be prevented, the goal is to prevent as many ulcers as possible. If a pressure ulcer does occur, caregivers’ essential focus must be on healing or preventing further deterioration and infection.
Selected references Columbia Medical Center Subsidiary, L.P., d/b/a/ North Central Medical Center, Appellant, v. John Meier, Appellee. 198 S.W. 3d 408 (Ct. Appeals 2006).
Lyder CH, Ayello EA. Pressure ulcers: A Patient Safety Issue. In: Hughes RG, ed. Patient Safety and Quality: An Evidence-Based Handbook For Nurses. Rockville, MD: Agency For Healthcare Research and Quality. April 2008. www.ncbi.nlm.nih.gov/books/
NBK2650/. Accessed November 1, 2012.
Nancy J. Brent is an attorney in Wilmette, Illinois. The information in this article is for educational purposes only and doesn’t constitute legal advice.
Do you experience chronic stress? Is your body stiff and inflexible? Does your mind seem dull and sluggish, your spirit exhausted?
Restorative yoga may help “open” your joints, ease your mind, and revive your spirit. It’s based on the concept that we’re overstimulated and don’t get enough rest. Constant stimulation activates the sympathetic nervous system, overtaxing the fight-or-flight response. The body responds by increasing cortisol and glucose production, which (along with additional unhealthy responses) raises the risk of metabolic syndrome.
Restorative yoga promotes active relaxation, helping to halt the overstimulation cycle. It promotes balance by alternately stimulating and relaxing the body, which is supported in yoga poses with such props as blankets, pillows, yoga mat, and eye covers. Research suggests restorative yoga may ease hot flashes in postmenopausal women and may promote a calm, positive mood in women with ovarian or breast cancer.
Five facets of restorative yoga
Restorative yoga takes a five-faceted approach to relieve the effects of stress. Over time, you’re likely to notice a new awareness of and appreciation for your body, mind, and spirit.
Simply put, networking is an information exchange, a forum for communicating your needs or agenda and, in return, listening and responding to others’ needs or agendas. Good networking requires emotional reciprocity, which means caring about the needs and agendas of the people you network with. Caring about others’ needs is what nurses do, so networking really shouldn’t be that difficult for a nurse.
1. Using props, restorative yoga supports the body in yoga poses, helping muscles and joints release tension and achieve muscular balance.
2. The restorative poses move the spine in all directions—flexion, extension, rotation, and lateral flexion. This enhances spinal flex-ibility, lubricates vertebrae, and strengthens the deep muscles that stabilize the spine.
3. Inverted poses, in which the feet and legs are elevated, counter the effects of gravity and promote lymph and fluid drainage to the heart.
4. The poses compress and release internal organs, cleansing them while aiding removal of cellular waste and renewing oxygen and nutrients.
5. Finally, the poses balance the body’s male (prana) and female (apana) energies.
Learning the poses
To learn the poses, consider taking a restorative yoga class. (See Finding an instructor.) Beforehand, make sure to tell the instructor about any special health concerns you have, so the instructor can modify the poses for you. Expect to bring your own blankets, pillows, eye covers, and yoga mat. The class will last from 60 to 90 minutes.
Restorative yoga typically doesn’t involve active (hatha) yoga poses, although it may include stretching poses to warm muscles and joints before the restorative poses begin. The instructor will help you use your props to make the poses right for you, and will direct you into a pose using them. Expect to stay in the pose for 5 to 10 minutes. The instructor will guide you by helping you focus on your breath and turn your attention inward. If your mind wanders and your body stays active, accept this reaction and don’t judge yourself. Over time, you’ll learn to use your breath to release tension and to focus and calm your mind.
After you hold the pose for the required duration, the instructor will help you into the next one. Generally, the class is near-silent, with minimal talking; the lights are low and music may play.
When the class ends, you may feel more relaxed and in touch with yourself. If you feel restless and jittery instead, accept your reaction. Don’t judge yourself. Try again. Give yourself the opportunity to experience something different.
Restorative yoga is just one method to renew and reconnect with your inner being. Only you can know if it’s right for you. n
Selected references
Cohen B, Kanaya A, Macer J, Shen H, Chang A, Grady D. Feasibility and acceptability of restorative yoga for treatment of hot flushes: a pilot trial. Maturitas. 2007;56(2):198-204.
Danhauer SC, Tooze JA, Farmer DF, Campbell CR, McQuellon RP, Barrett R, Miller BE. Restorative yoga for women with ovarian or breast cancer: findings from a pilot study. J Soc Integr Oncol. 2008;6(2):47-58.
Lisa Marie Bernardo is the managing member of The PIlates Centre, LLC, in Hampton Township, Pennsylvania, and adjunct faculty at Carlow University School of Nursing in Pittsburgh, Pennsylvania.
To find a certified yoga instructor in your area, check the Yoga Alliance website at www.yogaalliance.com. Restorative Yoga Teachers (www.restorativeyogateachers.com) focuses exclusively on restorative yoga. This site is operated by Judith Hansen Lasater, PhD, the leader in restorative yoga practice.
Editor’s note: Part 1 of this series, published in the September-October issue, discussed lymphedema pathology and diagnosis. This article, Part 2, covers treatment.
Traditional treatment approaches
Traditionally, lymphedema treatment has been approached without a clear understanding of the underlying structure and function of lymphatic tissues. Ineffective traditional treatments include elevation, elastic garments, pneumatic pumps, surgery, diuretics, and benzopyrones (such as warfarin). Because many traditional treatments are still overused and some may be appropriate for limited use, it’s important for clinicians to understand these approaches.
Elevation
As a sole therapy for lymphedema, elevation of the affected part provides only short-lived results. Ever-increasing macromolecular wastes retain water against the effects of gravity. Increased interstitial colloid osmotic pressure must be addressed by interventions targeted at improving lymphatic function—not just a position change. Otherwise, lymphedema will progress. Furthermore, elevation alone is impractical, promotes deconditioning, and alters lifestyle for prolonged periods.
Elastic garments
Elastic garments prove inadequate because they attempt to treat lymphedema with compression alone. Medically correct garments are engineered with thoughtful attention to high-quality textiles and offer gradient support, which promotes proximal flow. However, without precise tissue stimulation leading to improved lymphangioactivity (lymph-vessel pulsation), macromolecular wastes can’t be removed.
Interstitial pressure increases caused by compression garments impede further fluid accumulation. When these garments are removed, the spontaneous girth increase causes an imprecise fit, and the garment rapidly leads to a countertherapeutic effect. Furthermore, compression garments don’t combat the osmotic forces generated by ever-increasing interstitial wastes. Except in patients diagnosed with stage 0 or stage 1 lymphedema, disease progression involving metaplasia ensues. Although elastic compression garments are a cornerstone of long-term management, they shouldn’t be used as a stand-alone treatment.
Pneumatic compression pump
Formerly, the pneumatic compression pump (PCP) was considered the standard of care for lymphedema. However, when inflated, the pump doesn’t increase the frequency of lymph-vessel contraction or enhance lymph capillary absorption. What’s more, accelerated fibrosis development and rapid tissue refilling occur when a PCP is removed. Also, PCP use disregards the ipsilateral territory of the excised regional nodes, effectively dumping fluid from the leg into the trunk. A PCP is appropriate only when nothing else is available, as it may worsen the patient’s condition.
Surgery
Surgical approaches to treating lymphedema involve either excisional (debulking) or microsurgical techniques. The most extensive surgical technique, the radical Charles procedure, completely debulks all involved tissue down to the muscle fascia. Split-thickness grafts are then harvested from excised skin and donor sites, and applied to the fascia to achieve so-called limb reduction.
Most debulking procedures have been applied to lower-extremity lymphedema and offer poor cosmetic results. Less radical surgeries favor long incisions, preserving the skin but excising subcutaneous edematous portions to reduce girth. Although less cosmetically alarming, these procedures effectively amputate the subcutaneous space where lymph vessels reside. Other surgical approaches are beyond the scope of this article.
Generally, surgery isn’t a good approach for any patient, as it’s linked to significant morbidity, such as skin necrosis, infection, and sensory changes. In the future, less invasive procedures may be available that yield significant improvement without these adverse effects.
Diuretics
Although diuretics are prescribed appropriately to address water-rich edemas of venous origin, they disregard the fact that lymphedema is a protein-rich edema. Long-term, high-dose diuretic therapy leads to treatment-resistant limbs, similar to those that have received intensive pneumatic compression.
Benzopyrones
Benzopyrones such as warfarin decrease swelling by combating protein accumulation in fluid. Such drugs have undergone clinical trials abroad. Their mechanism is to promote macrophage migration into interstitial fluid, as well as subsequent proteolysis. Due to significant risk of liver damage or failure, benzopyrones haven’t been approved for treating lymphedema.
Complete decongestive therapy: The current treatment approach
Currently, the gold standard for lymphedema treatment is complete decongestive therapy (CDT). Michael Foeldi and Etelka Foeldi, who originated this method, discovered a unique symbiotic relationship among five distinct modalities that addresses the challenges of lymphedema treatment. In 1989, CDT was brought to the United States by Robert Lerner and has become the mainstay of lymphedema treatment here.
CDT is a two-phase approach involving an intensive clinical effort followed by a semi-intensive home-care program geared toward autonomous management, stabilization, and continual improvement. It involves manual lymph drainage (MLD), compression bandaging, exercise, skin and nail hygiene, and self-care education. (See Phases of complete decongestive therapy by clicking the PDF icon above.)
Manual lymph drainage
A type of soft-tissue mobilization, MLD provides skin traction, stimulating superficial lymph vessels and nodes. Lymph capillaries contain large inter-endothelial inlets called swinging tips, akin to overlapping shingles. Each overlapping cell is tethered to the interstitial matrix by anchoring filaments, so that fluid increases cause immediate distention and lymph inflow. Manual skin traction using MLD promotes greater lymph fluid uptake by stretching these filamentous structures, opening the swinging tips.
MLD also provides extrinsic stimulation of the lymphangion (the segment of a lymph vessel between a distal and proximal valve), drawing fluid into the system at the capillary level and promoting flow at the vessel level toward regional lymph nodes. Usually, these segments contract and relax in a rhythmic fashion six times per minute. MLD triples this output to 18 or 20 times per minute, greatly enhancing systemic transport.
MLD requires intensive daily treatment sessions to strengthen collateral flow as a pathway to circumventing surgical or developmental lymphatic disruption. Treatment strategies further recruit more deeply situated lymphatics such as the thoracic duct, as well as lumbar trunks that empty at the juncture of the internal jugular and subclavian veins to improve global uptake. MLD thus stimulates deeper vessel angioactivity to help drain the superficial vessels that drain toward them.
Compression bandaging
Compression bandaging provides tissue support after MLD to prevent reflux, slow new fluid formation, and mechanically soften fibrotic areas. Bandaging techniques provide a high working pressure to harness the muscle and joint pumps as a propellant for lymph while resisting retrograde flow created by gravity and centrifugal forces during movement. Pure cotton materials coupled with specialized padding create a soft, castlike environment, which confines swollen tissues without constriction. By relying on high working pressure and low resting pressures to decrease limb swelling, this strategy achieves greater control over intensity (level of compression/pressure exerted), with little to no soft-tissue injury or discomfort.
The patient wears this bulky inelastic complex after each MLD treatment until the next day’s session to ensure limb-volume reduction in a stable, linear fashion. Once a plateau is reached, tissue stabilization and self-care education are the goals of additional sessions.
Exercise
Exercise always must be done with adequate support to counteract fluid formation. During the intensive CDT phase, limbs are bandaged to provide complete around-the-clock containment. Gentle exercises encourage blood flow into the muscle; during muscle contraction, this creates a favorable internal pressure that effectively squeezes the subcutaneous space between the bandage wall and muscle. Because every bandage strives to provide a gradient of support, fluid tends to drain proximally to the bandage—in most cases, to the trunk.
Skin and nail hygiene
Without intact, well-hydrated skin, cellulitic infections occur in many lymphedema patients whose immune response has been diminished by regional lymphadenectomy or inherited deficiencies. To prevent infection caused by avoidable external events, patients receive clear guidelines to reinforce appropriate behavior. As most cellulitis results from resident skin pathogens (streptococci and staphylococci), maintaining a low skin pH helps control colonization. Ways to avoid recurrent infections include maintaining an acid mantle on the skin using low-pH-formulated lotions and avoiding injury from daily tasks that may scratch, puncture, burn, or abrade the skin. Patients should receive lists of self-care precautions at the time of treatment.
Self-care education
Because lymphedema is a chronic condition, patients must receive self-care education for daily management to avoid lymphedema destabilization, which can lead to tissue saturation and subsequent skin changes. Therapists must provide patients with appropriate self-care tools and knowledge to maintain adequate treatment results. Teaching topics include how to apply and remove compression garments and bandages and how to exercise safely, preserve skin integrity, monitor for infection, and respond appropriately to infection and significant changes in limb mobility.
An underrecognized and mistreated problem
Lymphedema remains an underrecognized and mistreated condition, even though CDT yields safe, reliable results. Early detection, accurate staging, proper diagnosis, and appropriate treatment can slow the inevitable progression of lymphedema. Wound care specialists should adapt wound therapy to address not just the wound but the edematous environment responsible for delayed wound resolution.
Selected references
Al-Niaimi F, Cox N. Cellulitis and lymphedema: a vicious cycle. J Lymphoedema. 2009;4:38-42.
Browse N, Burnand KG, Mortimer PS. Diseases of the Lymphatics. London: Hodder Arnold; 2003.
Casley-Smith JR, Casley-Smith JR. Modern Treatment for Lymphoedema. 5th ed. The Lymphoedema Association of Australia; 1997.
Cooper R, White R. Cutaneous infections in lymphoedema. J Lymphoedema. 2009:4:44-8.
Foeldi M. Foeldi’s Textbook of Lymphology: For Physicians and Lymphedema Therapists. 3rd ed. St. Louis, MO: Mosby; 2012.
International Society of Lymphology. The diagnosis and treatment of peripheral lymphedema. Consensus Document of the International Society of Lymphology. Lymphology. 2009 Jun;42(2):51-60.
Leduc A, Bastin R, Bourgeois P. Lymphatic reabsorption of proteins and pressotherapies. Progress in Lymphology XI. 1988:591-2.
National Lymphedema Network Medical Advisory Committee. Position Statement: Lymphedema Risk Reduction Practices. Revised May 2012. http://www.lymphnet.org/pdfDocs/nlnriskreduction.pdf. Accessed September 5, 2012.
Pappas CJ, O’Donnell TF Jr. Long-term results of compression treatment for lymphedema. J Vasc Surg. 1992 Oct;16(4):555-62.
Whittlinger H. Textbook of Dr. Vodder’s Manual Lymphatic Drainage. Vol 1. 7th ed. New York, NY: Thieme; 2003.
Steve Norton is cofounder of Lymphedema & Wound Care Education and executive director of the Norton School of Lymphatic Therapy in Matawan, New Jersey.
Sherry stands nervously in the doorway, watching several dozen people chat each other up. The sound of her heartbeat threatens to drown out the conversational din. For the people on the other side of the door, this is a networking event. But for Sherry, it seems like a swap meet of business cards.
If Sherry sounds like you, know that you’re not alone. For many people, networking means an awkward evening spent cradling a wine glass in one hand, thrusting a business card at someone with the other hand, and exchanging small talk.
“Hello. My name is…”
Networking is one of the most overused, misunderstood, and underestimated terms in the business world (and yes, that includes health care). Actually, networking is just a newish term for an activity that has been around for millennia. Savvy people have always seen the wisdom of seeking out others who can help them get ahead.
Simply put, networking is an information exchange, a forum for communicating your needs or agenda and, in return, listening and responding to others’ needs or agendas. Good networking requires emotional reciprocity, which means caring about the needs and agendas of the people you network with. Caring about others’ needs is what nurses do, so networking really shouldn’t be that difficult for a nurse.
Think of networking as a great opportunity to make yourself known, gather critical information, and meet people who can help you now and in the future. Through networking, you can make contacts that further your agenda—whether it’s to find
a mentor, get information on a program you’re interested in, change jobs, or advance from your current position.
Networking isn’t just who you know, but who knows you. If you listen to other networkers and give them the resources they seek (as by introducing them to key people or sharing valuable information), they’ll become grateful—and indebted—networking colleagues.
Set a networking goal
At a networking event, the idea isn’t to meet the greatest number of people possible in one evening. It’s to meet the “right” people—those who can help you realize your goal.
When approaching a networking situation, ask yourself, “What do I want this experience to lead to?” You’ll be much more effective if you have a laser-focused goal. The most successful networker isn’t the one who walks away with the most business cards. It’s the one who leaves with the contacts and information he or she had been seeking.
A tale of two networkers
To demonstrate this point, let’s take the case of two wound care specialists, Myrna and Doris—colleagues who’ve carpooled together to a meeting of their professional organization.
Myrna arrives with an agenda and a plan for the evening: She wants to develop a wound care speakers bureau to boost the community profile of staff at her facility. She seeks out several speakers, who give her valuable tips on how to market her expertise. She also shares her vision of a speakers bureau with attendees from other facilities—and is surprised by the support and tips they offer. She leaves the meeting with valuable information that can further her vision. On the way home, she jots down a reminder to send one of the people she met an article he might find helpful. She also makes notes about what she learned tonight, so she can follow up that week. Clearly, Myrna’s networking has been effective.
Doris, on the other hand, goes to the meeting unfocused. She meanders about the room speaking with a lot of attendees, and exchanges a few business cards. But the “Where-do-you-work?” conversations that ensue provide little insight. Although she enjoys the meeting somewhat, she has accomplished little. That’s understandable, as she set out with no goals. She might have been better off spending the night watching television.
Networking etiquette
To succeed at networking, learn networking etiquette. Rule #1: Turn off your cell phone—or at least put the ringer on vibrate. If you absolutely must take a phone call, discreetly leave the room.
More etiquette advice:
• Wear your name tag on your left lapel so you don’t block your name when shaking hands. If you fill out the name tag yourself, print clearly so your name and title are visible from about 5 feet away. That way, others won’t need to squint at your chest to read your name.
• Keep your handshake firm and friendly. Don’t hang on, and don’t pump! Remember to make eye contact, and smile.
• Keep breath mints handy. Networking usually takes place around drinks and food, and the first thing that greets a new contact shouldn’t be the garlic and onion dip.
• Keep your business cards handy (a business card holder is best), but don’t throw them at everyone you meet. Hand your business card to a contact so it’s right side up and facing that person. When someone hands you a business card, take a moment to look at it; then say thank you and carefully put it away. It’s disrespectful to deface a business card, so don’t write on the back of it.
What happens next?
Okay—you’ve set an agenda, attended the networking event without violating etiquette, and made some good contacts. Now what? This is where many people drop the ball. They fail to follow through on the contacts they make and the information they gain. They simply shove the contacts’ business cards into a Rolodex, where they will sit forgotten.
Instead of letting business cards collect dust, develop a system that helps you follow through with your contacts—whether it’s an electronic tool, a simple calendar notation, or a color-coded filing system. Jot down contact information on each
person you met, along with a summary
of your conversations, when you need to follow up, and so forth. Make the system work for you.
Next, follow through with appropriate communication. Send handwritten thank-you notes to the contacts who gave you valuable information or resources—for instance, those who introduced you to a key player or offered to make a phone call on your behalf. If possible, your note should mention how that information worked out for you. (See Seven steps to effective networking by clicking the PDf icon above.)
In the coming weeks, months, or years, keep these relationships alive and thriving by sending tips or information to each contact. If you see a newspaper article or Internet story about a topic a particular contact was interested in, send it to him or her. This shows you’re thinking about that person, and conveys your generosity and willingness to continue a reciprocal relationship.
Make it happen
Networking opportunities can happen anywhere. Don’t wait for them—create them. Pinpoint your goal, identify the key people who can help make it happen—and then network! It’s as simple as picking up the phone, sending an e-mail, or meeting over lunch. With a little effort, networking can be an enjoyable and valuable career resource.
Joan C. Borgatti, MEd, RN, is the owner of Borgatti Communications in Wellesley Hills, Mass., which provides writing, editing, and coaching services. You may e-mail her at [email protected].