By Nancy Chatham, RN, MSN, ANP-BC, CCNS, CWOCN, CWS, and Lori Thomas, MS, OTR/L, CLT-LANA
An estimated 7 million people in the United States have venous disease, which can cause leg edema and ulcers. Approximately 2 to 3 million Americans suffer from secondary lymphedema. Marked by abnormal accumulation of protein-rich fluid in the interstitium, secondary lymphedema eventually can cause fibrosis and other tissue and skin changes. (more…)
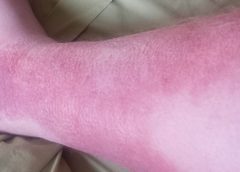
The ability to understand or “read” lower-extremity redness in your patient is essential to determining its cause and providing effective treatment. Redness can occur in multiple conditions—hemosiderin staining, lipodermatosclerosis, venous dermatitis, chronic inflammation, cellulitis, and dependent rubor. This article provides clues to help you differentiate these conditions and identify the specific cause of your patient’s lower-extremity redness. (more…)
The Affordable Care Act of 2010 requires nursing homes to have an acceptable Quality Assurance and Performance Improvement (QAPI) plan within a year after the start of the QAPI regulation. While the implementation of this regulation may be a year out, now is the time to start applying its principles. Reducing pressure ulcer rates is a great program to target for a QAPI plan.
A team approach
If you decide to use pressure ulcers as your QAPI project, don’t take on your entire program at once. Break the program down into system subsets (for example, admission process, prevention program, and weekly rounds). Determining the status of your program in each subset—completed, needs improvement, or not completed—can help you prioritize which areas to target. It’s important you have support from leadership for your efforts.
I’ll use the example of the admission phase (ensuring that within the first 24 hours, skin and risk concerns are identified and a temporary plan of care is implemented) to illustrate a QAPI project. To address this area, a team was created, including representation from staff members involved with the admission process. The team then used the problem-solving model Plan-Do-Study-Act (PDSA) to examine the process.
The first step in the PDSA cycle is to Plan. During this step, you:
• evaluate and analyze the current process to determine baseline data, which are used to measure progress
• identify system performance gaps
• determine the root cause of the performance gaps
• develop an action plan that identifies the goals, steps, responsible staff, and target dates.
In our example, the team determined that within the first 24 hours, skin inspections were being completed only 10% of the time. The root-cause analysis revealed that the admission nurses didn’t feel competent to document identified pressure ulcers or skin concerns, so they deferred it until the wound nurse was available. The team’s action plan included the following:
• Develop and educate all the facility nurses on how to complete and accurately document a skin inspection.
• Develop and implement a competency evaluation to assess the nurse’s ability to apply the knowledge at the bedside.
• Develop an ongoing plan to ensure all nurses receive this education during orientation and yearly thereafter.
The team also set the following goal:
By the end of the next quarter, 100% of admitted patients will have an accurate skin inspection completed within 24 hours of admission.
The second step of the PDSA cycle is Do. During this step, you implement and execute the plan, while documenting your observations and recording data.
In our example, the “Do” was to:
• develop and provide the skin inspection education and bedside competency evaluations
• develop an evaluation and tracking
system
• add the education to the orientation program
• add the education to the staff development calendar to be offered yearly.
The third step of the PDSA cycle is to Study: In this phase, you:
• reevaluate and analyze the system
• compare the results with the baseline data and predictions
• summarize what was learned and accomplished and what needs to be improved
• determine if another PDSA cycle is
necessary to continue to improve the system.
Once all staff had been properly educated and competency testing completed, an analysis of the rate and accuracy of the admission skin inspections done within 24 hours of admission was completed. It was found that 100% of the patients admitted had a complete skin inspection done within 24 hours. However, not all the nurses could accurately stage pressure ulcers, so it was determined that the system needed improvement to ensure accurate assessments.
The last step of the PDSA cycle is to Act. In this step, you:
• determine what changes need to be made
• modify the plan to continue to improve the system
• repeat the PDSA cycle as necessary.
In our example, the team determined the nurses needed more guidance and education on staging of pressure ulcers. Therefore, a new PDSA cycle was set to ensure the nurses are competent in this area.
Benefits for staff and patients
It may be difficult to start the QAPI project and at times the process may be stressful, but keep in mind that a successful pressure ulcer QAPI project can improve not only the quality of life and care of your patients but also morale and team building for your staff. n
Jeri Lundgren is director of clinical services at Pathway Health in Minnesota. She has beenspecializing in wound prevention and management since 1990.
With so much focus on dressing choices, it’s easy to forget the importance of wound cleansing. Cleaning a wound removes loose debris and planktonic (free-floating) bacteria, provides protection to promote an optimal environment for healing, and facilitates wound assessment by optimizing visualization of the wound. You should clean a wound every time you change a dressing, unless it’s contraindicated.
Here’s a review of how to choose and use a wound cleanser so you can see if your practice is up to date. (more…)
Each month, Apple Bites brings you a tool you can apply in your daily practice.
Description
A hydrocolloid dressing is a wafer type of dressing that contains gel-forming agents in an adhesive compound laminated onto a flexible, water-resistant outer layer. Some formulations contain an alginate to increase absorption capabilities. The wafers are self-adhering and available with or without an adhesive border and in various thicknesses and precut shapes for such body areas as the sacrum, elbows, and heels. Click here to see examples of
hydrocolloid dressings.
By Rosalyn Jordan, RN, BSN, MSc, CWOCN, WCC, and Marci Christian, BBE
Any patient with a fecal or urinary ostomy may experience complications on the skin surface around the stoma. These complications may occur lifelong, although they’re more common during the first 5 years after the initial ostomy surgery. Causative factors include infection, trauma, certain diseases, and chemical irritation; most of these problems stem from the pouching system or pouch leakage.
Peristomal skin complications can cause a wide range of signs and symptoms, from skin discoloration to polyp-like growths, from erythema to full-thickness wounds. They can lead to discomfort, pain, poor self-image, social isolation, and impaired quality of life, not to mention additional care costs.
Incidence and types of these complications are hard to compare or contrast across multiple patients. Until recently, no standardized assessment or documentation tools were available to characterize or define complications. For this reason, reported rates ranged widely, from 10% to 70%. And because no designated common language or categories related to peristomal skin complications existed, documentation was inconsistent.
In the late 2000s, a group of nurses experienced in caring for ostomy patients worked with the World Council of Enterostomal Therapists to develop a resource called the Ostomy Skin Tool, which clinicians can use to categorize and describe peristomal skin complications in a consistent, objective manner. The tool also provides a common language for documentation.
The Ostomy Skin Tool has three major assessment domains—discoloration (D), erosion/ulceration (E), and tissue overgrowth (T), known collectively as DET. The DET combined rating ranges from normal, rated 0, to the worst condition possible, rated 15. Mild DET complications are documented as less than 4, moderate as less than 7, and severe as 8 or higher. (See Using the Ostomy Skin Tool by clicking the PDF icon above.)
The tool describes four categories of peristomal complications:
• chemical irritation
• mechanical trauma
• disease-related complications
• infection-related complications.
Chemical irritation
Chemical irritation can stem from irritants (as in contact dermatitis) or allergic reactions (allergic dermatitis). The most likely cause of chemical dermatitis is effluent leakage (feces or urine) from the colostomy, ileostomy, or urostomy, in which effluent comes in contact with peristomal skin. Other potential causes include contact with soap, certain adhesives, and adhesive removers.
The major treatment of chemical irritation is identification and removal of the offending agent, followed by patient and caregiver education on the new pouching procedure the patient must use. Follow-up assessment also is recommended. In a 2010 study that followed 89 patients for 1 year after ostomy surgery, about 50% of subjects experienced peristomal skin complications, most of them from pouch leakage. Another investigator estimated that 85% of ostomy patients experience pouch leakage at some time during their lives. Pouch leakage usually occurs when stool is extremely liquid (for instance, ileostomy effluent). Other causes of pouch leakage include wearing a pouch more than half full of effluent and abdominal contours that aren’t level. Besides changes in the pouching system, treatment may entail adding products to the pouching system or removing certain agents.
Some patients experience allergic dermatitis in reaction to products used in the pouching system (such as skin barriers, belts, pouch closures, or adhesives). However, allergic dermatitis is rare. One 2010 study suggested allergic reactions to these products occur in only about 0.6% of patients with peristomal skin irritation. Most major ostomy product manufacturers provide a patch test on request to help identify allergic conditions. Once the offending product is discontinued, allergic dermatitis should resolve rapidly.
Mechanical trauma
Mechanical trauma usually results from either the pouching system itself or its removal. It also may result from harsh or multiple skin-barrier removals, pressure from convex rings or pouches, and abrasive cleansing techniques. Some researchers believe the stronger the adhesive barrier and the more often a pouch is changed, the greater the risk of epidermal damage.
Mechanical trauma may present as a partial-thickness ulcer caused by pressure, shear, friction, tearing, or skin stripping. Patients with fragile skin are susceptible to mechanical trauma, so less aggressive pouching systems may be preferred for them. Of course, if the pouching system is changed, the patient or caregiver needs to learn about the new system.
Disease-related complications
Disease-related peristomal complications may be linked to preexisting skin conditions, such as psoriasis, eczema (atopic dermatitis), or seborrheic dermatitis. Hyperplasia also may occur. This overgrowth of cells, which may appear as gray or reddish brown pseudoverrucous lesions, usually is linked to urinary ostomies, although it can occur with fecal ostomies as well. Vinegar soaks are the recommended treatment, in addition to a change in the pouching system and corresponding patient education.
Occasionally, other disease-related complications occur, including primary adenocarcinoma of the peristomal skin and peristomal pyoderma gangrenosum, a painful and problematic condition that presents as peristomal ulcers. Ulcer borders are well-defined with a bluish purple coloration at the edges. Infection must be ruled out, as this condition usually is linked to an autoimmune condition. Treatment includes pain management and, in most cases, a topical corticosteroid. Crohn’s disease also may manifest as a peristomal skin ulcer.
Infection-related complications
Infection-related complications may be bacterial or fungal. Two common peristomal skin infections are folliculitis and Candida fungal infections. An infection of the hair follicle that causes pustules, folliculitis usually stems from traumatic hair pulling in the peristomal area during pouch removal. It may warrant a prescribed antibiotic, along with patient teaching regarding proper hair removal using an electric razor.
Candida infections may arise because peristomal skin provides a warm, dark, moist environment that promotes fungal growth. These infections appear as erythema with pustules or papules and satellite lesions. Treatment usually involves antifungal powder and use of the crusting technique to secure the pouching system. (See Using the crusting technique by clicking the PDF icon above.)
Management
Many complications are well advanced by the time patients seek assistance, perhaps because they don’t understand the significance of their symptoms and think they can manage the problem themselves. In some cases, they don’t know where to turn for assistance. Commonly, the complication progresses to the point where the patient goes to the emergency department or (particularly during the immediate postoperative period) needs to be readmitted for treatment. The best way to manage peristomal skin complications is to prevent them in the first place. (See Preventing peristomal skin complications by clicking the PDF icon above.)
Patient education
Over the past 20 years, hospital stays for ostomy surgery patients have decreased from about 2 weeks to less than 5 days. Reduced stays decrease the time available for caregivers to teach patients and family members how to empty and change the pouch. They need alternative education covering (among other topics) how to recognize peristomal skin complications and when to seek help. Not only do these complications require vigilant self-observation, but many patients don’t understand their implications or how rapidly they can worsen. In some cases, the first symptoms are itching and redness under the skin barrier. Fortunately, some patients may know or remember that itching, burning, stinging, reddened, or weeping peristomal skin requires professional attention. They can avoid serious complications by seeking assistance early, such as right after noticing pouch leakage.
Early treatment can reduce the cost of treatment. In a 2012 study, researchers estimated care costs related to peristomal skin complications for a 7-week treatment period, using the Ostomy Skin Tool as a reference. Severe complications (those with a DET score above 8) cost six times more to treat than mild cases (those with a DET score below 4) and 4.5 times more than moderate cases.
Along with early intervention by a trained ostomy care specialist, self-assessment by ostomy patients promotes a better quality of life, reduces pain, and may decrease care costs. Clinicians’ use of the Ostomy Skin Tool to assess and document peristomal skin complications promotes more reliable, objective, comparable assessment data for reporting.
Selected references
Al-Niaimi F, Lyon CC. Primary adenocarcinoma in peristomal skin: a case study. Ostomy Wound Manage. 2010;56(1):45-7.
Burch J. Management of stoma complications. Nurs Times. 2011;107(45):17-8, 20.
Jemec GB, Martins L, Claessens I, et al. Assessing peristomal skin changes in ostomy patients: validation of the Ostomy Skin Tool. Br J Dermatol. 2011; 164;330-5.
Jones T, Springfield T, Brudwick M, Ladd A. Fecal ostomies: practical management for the home health clinician. Home Healthc Nurse. 2011;29(5):306-17.
Martins L, Samai O, Fernandez A, et al. Maintaining healthy skin around an ostomy: peristomal skin disorders and self-assessment. Gastrointest Nurs. 2011;
9(2):9-13.
Martins L, Tavernelli K, Serrano JLC. Introducing a peristomal skin assessment tool: The Ostomy Skin Tool. World Council Enterostomal Therapists J. 2008;28(2):3-13.
Meisner S, Lehur P, Moran B, et al. Peristomal skin complications are common, expensive, and difficult to manage: a population based cost modeling study. PLoS One. 2012;7(5):e37813.
Omura Y, Yamabe M, Anazawa S. Peristomal skin disorders in patients with intestinal and urinary ostomies: influence of adhesive forces of various hydrocolloid wafer skin barriers. J Wound Ostomy Continence Nurs. 2010;37(3):289-98.
Ratliff CR. Early peristomal skin complications reported by WOC nurses. J Wound Ostomy Continence Nurs. 2010;37(5):505-10.
Shabbir J, Britton DC. Stomal complications: a literature overview. Colorectal Dis. 2010;12(10):958- 64.
Wound, Ostomy, Continence Clinical Practice Ostomy Subcommittee. Peristomal skin complications: Best practice for clinicians. Mt. Laurel, NJ; 2007.
The authors work for RecoverCare, LLC, in Louisville, Kentucky. Rosalyn Jordan is director of clinical education and Marci Christian is a clinical associate product specialist.
To begin appropriate treatment for chronic venous insufficiency (CVI), clinicians must be able to make the correct diagnosis. Part 1 (published in the March-April edition) described CVI and its presentation. This article provides details of the CVI diagnosis (including the differential diagnosis from other diseases), disease classification to help assess the extent of CVI, diagnostic studies used to diagnose CVI, and various treatment options to “rescue” the patient from CVI. (more…)
Assessing moisture and pressure risk in elderly patients continues to be a focus for clinicians in all settings, particularly long-term care. Ongoing research challenges our ideas about and practices for cleansing and protecting damaged skin. Until recently, most wound care clinicians have cleansed long-term care patients’ skin with mild soap and water. But several studies have shown pH-balanced cleansers are more efficient than soap and water for cleansing the skin of incontinent patients.
Various terms are used to describe skin breakdown related to moisture—incontinence-associated dermatitis, perineal dermatitis, diaper rash, intertriginal dermatitis, intertrigo, moisture-related skin damage, moisture-associated skin damage, and even periwound dermatitis. This article uses moisture-associated skin damage (MASD) because it encompasses many causes of skin breakdown related to moisture. Regardless of what we call the condition, we must do everything possible to prevent this painful and costly problem.
Skin assessment
Start with an overall assessment of the patient’s skin. Consider the texture and note dryness, flaking, redness, lesions, macerated areas, excoriation, denudement, and other color changes. (See Identifying pressure and moisture characteristics by clicking the PDF icon above.)
Assessing MASD risk
A patient’s risk of MASD can be assessed in several ways. Two of the most widely used pressure-ulcer risk scales, the Norton and Braden scales, address moisture risk. The Norton and Braden subscales should drive your plan for preventing skin breakdown related to moisture or pressure. The cause of breakdown (moisture, pressure, or shear/friction) must be identified, because treatment varies with the cause.
Both the Norton and Braden scales capture activity, mobility, and moisture scores. The Braden scale addresses sensory perception, whereas the Norton scale identifies mental condition. (See Subscales identifying pressure, shear, and moisture risk by clicking the PDF icon above.) Also, be aware that two scales have been published for perineal risk, but neither has been used widely.
You must differentiate pressure- and moisture-related conditions to determine correct treatment. Patients who are repositioned by caregivers are at risk for friction or shear. Also, know that agencies report pressure-ulcer prevalence. Care providers no longer classify mucous-membrane pressure areas in skin prevalence surveys; mucous membranes aren’t skin and don’t have the same tissue layers. Furthermore, don’t report skin denudement from moisture (unless pressure is present) in prevalence surveys.
When moisture causes skin breakdown
Skin has two major layers—epidermis and dermis. The epidermis itself has five layers: The outermost is the stratum corneum; it contains flattened, keratin protein–containing cells, which aid water absorption. These cells contain water-soluble compounds called natural moisturizing factor (NMF), which are surrounded by a lipid layer to keep NMF within the cell. When skin is exposed to moisture, its temperature decreases, the barrier function weakens, and skin is more susceptible to pressure and friction/shear injury. Also, when urea in urine breaks down into ammonia, an alkaline pH results, which may reactivate proteolytic and lipolytic enzymes in the stool. (See Picturing moisture and pressure effects by clicking the PDF icon above.)
Caring for moisture-related skin breakdown
The standard of care for moisture-related skin breakdown includes four major components: cleanse, moisturize, protect, and contain. Specific products used for each component vary with the facility’s product formulary.
Cleanse
Gently wash the area using a no-rinse cleanser with a pH below 7.0. Don’t rub the skin. Pat dry.
Moisturize
Use creams containing emollients or humectants. Humectants attract water to skin cells and help hold water in the cells; don’t use these products if the skin is overhydrated. Emollients slow water loss from skin and replace intracellular lipids.
Protect
Options for skin protectants include:
• liquid film-forming acrylate sprays or wipes
• ointments with a petroleum, zinc oxide, or dimethicone base
• skin pastes. Don’t remove these products totally at each cleansing, but do remove stool, urine, or drainage from the surface and apply additional paste afterward. Every other day, remove the paste down to the bare skin using a no-rinse cleanser or mineral oil.
Be sure to separate skinfolds and use products that wick moisture rather than trap it. These may include:
• commercial moisture-wicking products
• a light dusting with powder containing refined cornstarch or zinc oxide—not cornstarch from the kitchen or powder with talc as the only active ingredient
• abdominal pads.
Contain
To keep moisture away from skin, use absorbent underpads with wicking properties, condom catheters (for males), fecal incontinence collectors, fecal tubes (which require a healthcare provider order), or adult briefs with wicking or gel properties. Call a certified ostomy or wound care nurse for tips on applying and increasing wear time for fecal incontinence collectors.
If 4″ × 4″ gauze pads or ABD pads are saturated more frequently than every 2 hours, consider applying an ostomy or specially designed wound pouch to the area. Collecting drainage allows measurement and protects skin from the constant wetness of a saturated pad.
Don’t neglect the basics, for example, know that wet skin is more susceptible to breakdown. Turn the patient and change his or her position on schedule. Change linens and underpads when damp, and consider using a low-air-loss mattress or bed or mattress with microclimate technology.
Also, be aware that fungal rashes should be treated with appropriate medications. If the patient’s skin isn’t too moist, consider creams that absorb into the skin; a skin-protecting agent can be used as a barrier over the cream. Besides reviewing and using the standards of care, you may refer to the Incontinence-Associated Dermatitis Intervention Tool, which has categories related to skin damage. See the “Incontinence-Associated Dermatitis Intervention Tool” (IADIT).
Bottom line on skin breakdown
To help prevent skin breakdown related to moisture, assess patients’ skin appropriately, determine treatment using evidence-based guidelines, and implement an appropriate plan of care.
Selected references
Black JM, Gray M, Bliss DZ, et al. MASD part 2: incontinence-associated dermatitis and intertriginous dermatitis: a consensus. J Wound Ostomy Continence Nurs. 2011;38(4):359-70.
Borchert K, Bliss DZ, Savik K, Radosevich DM. The incontinence-associated dermatitis and its severity instrument: development and validation. J Wound Ostomy Continence Nurs. 2010;37(5):527-35.
Doughty D. Differential assessment of trunk wounds: pressure ulceration versus incontinence-associated dermatitis versus intertriginous dermatitis. Ostomy Wound Manage. 2012;58(4):20-2.
Doughty D, Junkin J, Kurz P, et al. Incontinence-associated dermatitis: consensus statements, evidence-based guidelines for prevention and treatment, and current challenges. J Wound Ostomy Continence Nurs. 2012;39(3):303-15.
Gray M, Beeckman D, Bliss DZ, et al. Incontinence-associated dermatitis: a comprehensive review and update. J Wound Ostomy Continence Nurs. 2012;
39(1):61-74.
Gray M, Black JM, Baharestani MM, et al. Moisture-associated skin damage: overview and pathophysiology. J Wound Ostomy Continence Nurs. 2011;38(3):233-41.
National Pressure Ulcer Advisory Panel and European Pressure Ulcer Advisory Panel. Prevention and treatment of pressure ulcers: clinical practice guideline.Washington, DC: National Pressure Ulcer Advisory Panel; 2009.
Wound, Ostomy and Continence Nurses Society. Guideline for Prevention and Management of Pressure Ulcers. Mt. Laurel, NJ: Wound, Ostomy and Continence Nurses Society; 2010.
Wound, Ostomy and Continence Nurses Society. Incontinence-Associated Dermatitis: Best Practice for Clinicians. Mt. Laurel, NJ: Wound, Ostomy and Continence Nurses Society; 2011.
Zulkowski K. Diagnosing and treating moisture-associated skin damage. Adv Skin Wound Care. 2012;25(5):231-6.
Patricia A. Slachta is an instructor at the Technical College of the Lowcountry in Beaufort, South Carolina.
The elevator door opens and you step in to find yourself face to face with the important person you’ve wanted to meet to discuss your promising idea. It’s the chance you wouldn’t want to miss. But that chance lasts only as long as the elevator ride. You have less than a minute to make an impression. Do you have an elevator speech ready?
What’s an elevator speech?
An elevator speech is any short speech that sells an idea, promotes a business, or markets an individual. It’s a short summary, or pitch, that quickly describes the value of a service, product, or organization. The term is a metaphor for unexpected access to someone to whom you’d like to sell an idea or proposal. It derives from the early days of the Internet boom when web development companies needed venture capital. Firms were swamped with applications for funding, and in many cases, the companies that won the cash were those whose reps had a simple pitch and could explain a business proposal in an elevator in the time it took to ride to their floor.
A great elevator speech describes and sells an idea in less than a minute. Of course, it’s not restricted to elevators. It comes in handy any time and anywhere you need to give a concise presentation to capture someone’s interest so you can move to the next step—a follow-up call, a referral, a meeting, or a partnership.
Why clinicians need an elevator speech
You need to be able to describe what you do, what you’re interested in doing, and how you can be a resource to someone. The ability to sum up a unique aspect of your service or expertise in a way that excites others is a fundamental skill. Doing this in a brief, persuasive manner is an asset for any professional. A good elevator speech should grab one’s attention in a few words and make that person want to know more about you. Here are examples where a good elevator speech would be helpful:
• Thomas goes to a recruitment fair hoping to get an interview at a certain hospital.
• Mary is finishing her master of science degree and is interested in a position in a new wound care clinic.
• Caroline has written a book on grant writing and would like to present her ideas at a conference.
• Brian is interested in research and would like to join the research team.
• Mindy is trying to expand her wound consultation business.
You can use an elevator speech when you want to grab someone’s attention at a meeting, convention, or other social situation. In such situations, people typically ask, “What do you do?” A well-planned elevator speech can make the listener’s ears perk up and want to know more.
How to prepare an elevator speech
Before you can write an elevator speech, you need to know yourself, what you can offer, what problems you can solve, and what benefits you can bring to the prospective contact. For example, you may be an expert in professional communication and know strategies you can teach other staff to promote a better workplace environment.
You also need to know your audience. Will you direct your pitch to an administrator, a unit manager, or staff? You’re more likely to succeed if your elevator speech is targeted to a specific audience and you adjust it to that audience. Try to prepare different pitches for different audiences; a generic pitch is almost certain to fail. (See Key elements of a good elevator speech by clicking the PDF icon above.)
In today’s busy world, clinicians must be able to communicate in a succinct, persuasive manner. Your elevator speech is your introduction to others. It has to be good. Keep practicing it and perfecting it so you can speak with poise and polish. The more often you give it, the better it will become. It’s a great way to put your best foot forward when you have only a small window of opportunity to make a good impression.
Sjodin T. Small Message, Big Impact: The Elevator Speech Effect. New York, NY: Portfolio; 2012. Sprung S, Giang V. 6 keys to delivering a powerful elevator pitch. Business Insider Web site. www .businessinsider.com/terri-sjodin-how-to-deliver- an-elevator-speech-2012-10. October 26, 2012. Accessed October 26, 2012.
Kathleen D. Pagana is a keynote speaker and professor emeritus at Lycoming College in Williamsport, Pennsylvania. She is the author of The Nurse’s Communication Advantage and The Nurse’s Etiquette Advantage. She is also the coauthor of Mosby’s Diagnostic and Laboratory Test Reference, 11th ed. To contact her, visit www.KathleenPagana.com.
The guidelines include recommendations for practice, education, policy, and future resource. Strategies for implementation are given, as well as several useful appendices, such as:
• Debridement Decision-Making Algorithm
• A Guide to Dressing Foot Wounds
• PEDIS: Diabetes Foot Ulcer Classification System
• Offloading Devices
• Optimal Treatment Modalities.
PREPARE is a useful and patient-friendly website designed to help prepare people to make complex medical decisions. The website was developed by clinical researchers from the San Francisco VA Medical Center; the University of California, San Francisco; and NCIRE—The Veterans Health Research Institute.
PREPARE uses videos to provide concrete examples of how to identify what is most important in life; how to communicate that with family, friends, and doctors; and how to make informed medical decisions when the time comes. Users can also download a PDF of a PREPARE pamphlet.
Free guides for infection prevention from APIC
Download two free implementation guides for infection prevention from the Association for Professionals in Infection Control and Epidemiology (APIC):
This revised guide contains strategies for prevention, considerations for specific patient populations, evolving practices, and how to incorporate current regulations.
Topics include:
• C. difficile in pediatrics and skilled nursing facilities
• pathogenesis and changing epidemiology of C. difficile infection diagnosis
• environmental control
• new and emerging technologies
• tools and examples to help apply preventative measures, such as hand hygiene monitoring, environmental cleaning, and isolation compliance.
This guide includes infection-prevention standards, regulations, and best practices, as well as instructions, examples, and tools to conduct surveillance and risk assessments.
One of the worst fears of a wound care clinician is inadvertently compressing a leg with critical limb ischemia—a condition marked by barely enough blood flow to sustain tissue life. Compression (as well as infection or injury) could lead to necrosis, the need for amputation, or even death. The gold standard of practice is to obtain an ankle-brachial index (ABI) before applying compression. However, recent research and expert opinion indicate an elevated or normal ABI is deceptive in patients with advanced diabetes. What’s worse, in the diabetic foot, skin may die from chronic capillary ischemia even when total blood perfusion is normal. For information on how to perform an ABI and interpret results, click on this link. (more…)